- 01 - Teste do WebApi
- 02 - Desenvolvimento do BackEnd
- 03 - Desenvolvimento do FrontEnd
Finalizando esse tutorial vamos desenvolver o FrontEnd, que vamos utilizar o EXTJS no CDN (Content Delivery Network ) , o que significa isso? é que o script está no servidor na nuvem , para facilitar a compreensão.
Adicionar o Documento de inicialização
Vamos começar adicionando uma pagina HTML para o inicio da aplicação , click direito na raiz do projeto ADD new item , selecione o template de HTML Page, renomeie para index.html que é o documento padrão para inicializar a maioria dos webservices.
This file contains bidirectional Unicode text that may be interpreted or compiled differently than what appears below. To review, open the file in an editor that reveals hidden Unicode characters.
Learn more about bidirectional Unicode characters
<!DOCTYPE html> | |
<html xmlns="http://www.w3.org/1999/xhtml"> | |
<head> | |
<title>Cadastro de Cliente</title> | |
<link rel="stylesheet" type="text/css" href="http://cdn.sencha.com/ext/gpl/5.0.0/build/packages/ext-theme-neptune/build/resources/ext-theme-neptune-all.css"> | |
<!-- REFERENCIA DO CDN --> | |
<script type="text/javascript" src="http://cdn.sencha.com/ext/gpl/5.0.0/build/ext-all.js"></script> | |
<script type="text/javascript" src="http://cdn.sencha.com/ext/gpl/5.0.0/build/packages/ext-theme-neptune/build/ext-theme-neptune.js"></script> | |
<script type="text/javascript" src="Scripts/app.js"></script> | |
</head> | |
<body> | |
</body> | |
</html> |
Adicionar uma Nova Pasta Script
Essa pasta será armazenado os arquivos de javascript.
Dentro da pasta Script Adicionar um novo arquivo app.js
Click direito na pasta Script ADD new item , selecione o template de JavaScript , esse é o arquivo que efetivamente aonde irão nosso desenvolvimento do front-end do EXTJS, abaixo a codificação da App em EXTJS.
This file contains bidirectional Unicode text that may be interpreted or compiled differently than what appears below. To review, open the file in an editor that reveals hidden Unicode characters.
Learn more about bidirectional Unicode characters
Ext.require(['Ext.data.*', 'Ext.grid.*']); | |
// Modelo de dados | |
Ext.define('Client', { | |
extend: 'Ext.data.Model', | |
fields: [ | |
{ name: 'ClientID', type: 'int' }, | |
{ name: 'FirstName', type: 'string' }, | |
{ name: 'LastName', type: 'string' }, | |
{ name: 'DateBirth', type: 'date', dateFormat: 'd/m/Y' }, | |
{ name: 'State', type: 'string' }, | |
{ name: 'City', type: 'string' }, | |
{ name: 'Zip', type: 'float' }, | |
{ name: 'Country', type: 'string' }, | |
{ name: 'Phone', type: 'float' }, | |
{ name: 'Email', type: 'float' } | |
] | |
}); | |
Ext.application({ | |
name: 'MyApp', | |
launch: function () { | |
// Store para armazenar os dados que terá o proxy contendo o CRUD | |
var store = Ext.create('Ext.data.Store', { | |
autoLoad: true, | |
autoSync: true, | |
model: 'Client', | |
proxy: { | |
type: 'rest', | |
url: '/api/Client/List', | |
reader: { | |
type: 'json', | |
root: 'data', | |
totalProperty: 'total' | |
}, | |
writer: { | |
type: 'json', | |
root: 'data', | |
encode: false, | |
listful: true, | |
writeAllFields: true | |
}, | |
headers: { 'Content-Type': 'application/json; charset=UTF-8' } | |
} | |
}); | |
// Grid | |
var rowEditing = Ext.create('Ext.grid.plugin.RowEditing'); | |
var grid = Ext.create('Ext.grid.Panel', { | |
renderTo: document.body, | |
plugins: [rowEditing], | |
height: 300, | |
frame: true, | |
title: 'Clientes', | |
store: store, | |
columns: [ | |
{ | |
text: 'ID', | |
width: 40, | |
dataIndex: 'ClientID' | |
}, | |
{ | |
text: 'Nome', | |
dataIndex: 'FirstName', | |
field: { | |
xtype: 'textfield' | |
} | |
}, | |
{ | |
xtype: 'datecolumn', | |
text: 'Data de Aniversário', | |
dataIndex: 'DateBirth', | |
editor: { | |
xtype: 'datefield', | |
format: 'd/m/y' | |
} | |
}, | |
{ | |
text: 'Estado', | |
dataIndex: 'State', | |
field: { | |
xtype: 'textfield' | |
} | |
}, | |
{ | |
text: 'Cidade', | |
dataIndex: 'City', | |
field: { | |
xtype: 'textfield' | |
} | |
}, | |
{ | |
text: 'Cep', | |
dataIndex: 'Zip', | |
field: { | |
xtype: 'textfield' | |
} | |
}, | |
{ | |
text: 'Pais', | |
dataIndex: 'Country', | |
field: { | |
xtype: 'textfield' | |
} | |
}, | |
{ | |
text: 'Telefone', | |
dataIndex: 'Phone', | |
field: { | |
xtype: 'textfield' | |
} | |
}, | |
{ | |
text: 'Email', | |
dataIndex: 'Email', | |
field: { | |
xtype: 'textfield' | |
} | |
} | |
], | |
dockedItems: [{ | |
xtype: 'toolbar', | |
items: [{ | |
text: 'Adicionar', | |
icon: 'http://cdn.sencha.com/ext/gpl/5.0.0/build/examples/shared/icons/fam/add.gif', | |
handler: function () { | |
store.insert(0, new Client()); | |
rowEditing.startEdit(0, 0); | |
} | |
}, '-', { | |
itemId: 'delete', | |
text: 'Remover', | |
icon: 'http://cdn.sencha.com/ext/gpl/5.0.0/build/examples/shared/icons/fam/delete.gif', | |
disabled: true, | |
handler: function () { | |
var selection = grid.getView().getSelectionModel().getSelection()[0]; | |
if (selection) { | |
store.remove(selection); | |
} | |
} | |
}] | |
}] | |
}); | |
grid.getSelectionModel().on('selectionchange', function (selModel, selections) { | |
grid.down('#delete').setDisabled(selections.length === 0); | |
}); | |
} | |
}); |
config.Routes.MapHttpRoute(
name: "DefaultApi",
routeTemplate: "api/{controller}/{id}/{data}",
defaults: new { id = RouteParameter.Optional,
data = RouteParameter.Optional
}
);
Então por fim temos a grid com edição na linha, e o CRUD do WebApi conversando JSON.
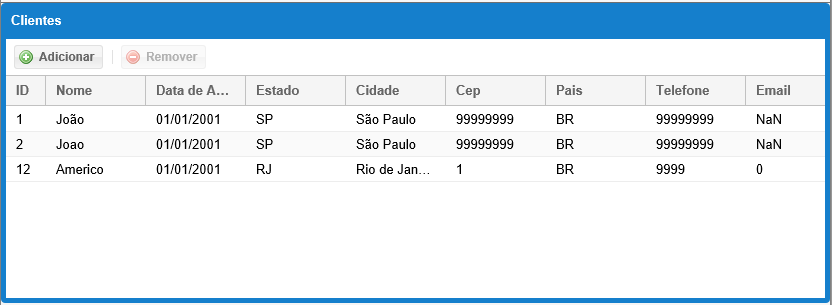
Espero que ajude o pessoal a compreender melhor a utilização do EXTJS com WebApi, e até a próxima.
Referencias
http://docs.sencha.com/extjs/5.1/
Código fonte
https://github.com/americoa/webapi/tree/03frontEnd
No comments:
Post a Comment